2014년 1월 21일 화요일

Solving an unknown error while burning a DVD video with Windows DVD Maker

Windows DVD Maker is good. It has some cool templates of DVD menu so people can make a decent DVD video or slideshow, but it also sucks. It makes a 4:3 ratio video from a 16:9 ratio wide source with the 16:9 screen setting. In addition, it spits just one warning message of something like "An error occurred while burning your DVD." and that's it. There is not one line of explanation or easy-to-find log about what the problem is. The user can only say ... "So what?"

This writing is one of the solutions for the underlined problem of Windows DVD Maker.

  1. Download and install MediaCoder 32bit or 64bit, which is an awesome and even free encoding program
  2. Run MediaCoder and choose AVI format for container, H.264 for video and MP3 for audio in its settings wizard
  3. Encode your videos with the setting above
  4. Run Windows DVD Maker and add your encoded .avi videos onto the list and burn!

Use a different blank DVD from the one you used when the error happened.

The problem seems it happens when the added video is encoded in a way that Windows DVD Maker cannot figure out while its trans-coding process after you click the Burn button.

Anyway, thank you, Colin MM

Source: At the end of http://social.technet.microsoft.com/Forums/windows/en-US/5a91b210-65ca-448b-82a9-ad8dbe8df782/windows-dvd-maker-error-an-error-occurred-when-burning-the-dvd-help?

And ...

COME ON, BIG COMPANY!


윈도우 DVD 메이커로 DVD 비디오를 구우려고 하면 오류를 뿜으며 계속 실패하는 문제에 대한 해결방법


  1. MediaCoder를 다운로드 받아서 실행시킨 후
  2. 설정 마법사에서 포맷은 AVI, 비디오는 H.264, 오디오는 MP3로 설정한 다음
  3. 구우려는 동영상을 위 설정으로 인코딩 하고
  4. 윈도우 DVD 메이커에서 불어와서 구우면 된다는 말씀!
출처는 위 링크의 마지막 댓글 참조.

2014년 1월 15일 수요일

MTP, 공인인증서(Korean Digital Certificate), and 연말정산 로그인(Korean the year-end tax adjustment site login)

안드로이드가 ICS(아이스크림 샌드위치)로 버전 업데이트 되면서 구글이 UMS 방식 대신 MTP 방식의 연결만을 지원하기 때문에, 인터넷 뱅킹이나 결제를 위한 빌어먹을 한국형 공인인증서의 사용이 불가능한 듯 보였으나, 방법이 있었다.

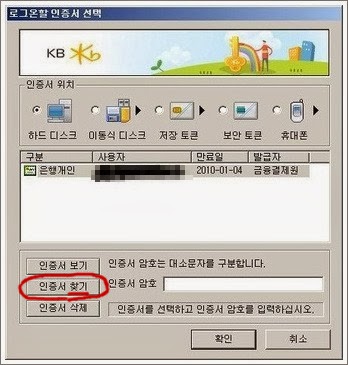
인증서 찾기, 인증서 찾아보기


단, 자신이 이용하는 사이트의 공인인증서 선택 대화상자에서 '인증서 찾기' 또는 '찾아보기' 등의 메뉴가 꼭 있어야 한다. 대부분의 은행 등의 사이트에서는 '찾기' 메뉴가 있는 대화상자를 제공하지만, 이게 없는 사이트도 있다. What the... 해당 메뉴가 없다면, 그냥 USB 메모리를 이용하자. 폰을 루팅하여 UMS 장치 연결을 활성화시키는 앱을 사용하는 등 다른 방법이 있지만, 그렇게까지 해야하나 싶다.

  • UMS: USB Mass Storage, 컴퓨터에 'USB 대용량 저장장치'라고 나오는 연결. D:, E:, Fxxx:과 같이 드라이브 문자(알파벳)가 할당 됨. 예전 스마트폰 연결 방식
  • MTP: Media Transfer Protocol, 컴퓨터에 'MTP 장치'라고 나오는 연결, 드라이브 문자가 할당이 되지 않아, 공인인증서 대화상자에서 '이동식 디스크' 메뉴로 스마트폰의 내/외부 저장소를 선택할 수 없음. 최근 스마트폰 연결 방식

준비물
스마트폰, USB 케이블, 컴퓨터(또는 USB 메모리)

필자가 신한은행을 이용하므로 그를 기준으로 얘기하겠음

  1. 자신이 이용하는 은행 사이트의 공인인증센터에 가서 복사/재발행 등의 방법으로 하드디스크(또는 USB 메모리)에 사용하려는 공인인증서를 넣는다
  2. 공인인증센터의 '인증서 관리' 메뉴를 클릭해 대화상자를 열고, 하단의 '고급' 메뉴 중에 '인증서 내보내기'를 선택하여 바탕화면에 저장한다. 저장되는 파일명은 '내이름xxxx번호들xxxx.p12 또는 .pfx
  3. 스마트폰을 케이블로 컴퓨터에 연결하여 MTP 장치로 인식하면, 탐새끼색기에서 방금 저장한 파일을 복사하여 내부저장소 혹은 SD 카드의 최상위 폴더에 붙여넣기 한다 (내부저장소 혹은 SD 카드 더블클릭한 다음에 붙여넣기 하란 얘기)
  4. 바탕화면에 파일은 삭제한다

여기까지가 준비...

이제 내 컴퓨터가 아닌 내 공인인증서가 없는 컴퓨터에 스마트폰을 연결하고 은행 사이트를 이용해보자.

  1. 개인인터넷뱅킹에서 공인인증서 로그인을 클릭하고 대화상자가 나타나면, '찾아보기' 혹은 '인증서 찾기'를 클릭한다
  2. 아까 .p12 또는 .pfx 파일을 저장했던 MTP 장치의 내부 저장소 혹은 SD 카드를 찾아간다
  3. 맨 밑의 '파일 종류'를 클릭하여 'All files ...'를 선택한다
  4. '내이름xxxx번호들xxxx.p12' 파일을 선택한다
  5. 공인인증서 암호를 입력한다
  6. 이제 대화상자 목록에 내 공인인증서가 보이면, 선택하여 다시 암호를 입력한다
하지만! 연말정산간소화 사이트에서는 3번의 'All files ...'를 선택할 수 없게 되어 있다... 하지만 방법이 있다. 탬색기에서 해당 .p12 파일의 이름을 복사하여, '인증서 찾기' 대화상자의 '파일 이름'에 붙여넣고, 확인을 클릭하면 된다. 단, 확장자까지 '내이름xxxx번호들xxxx.p12' 이렇게 포함하여 입력해야 한다.


쓰고 나니 진짜좀 불편하지만, USB 메모리를 따로 이용하기 싫은 사람에게 한줄기 희망이 되기를 바라며 글을 마친다.


This posting is a tip to use a 'Korean' digital certificate in your Android phone which connected as a MTP device to your PC.

MTP, media transfer protocol, which is accepted for Google's Android of ICS+ version to connect its device to a PC and but is not allowed to have an alphabet (like C:, D:, or F:) which bothers us in Korea to use Internet banking/shopping services and... even the year-end. :(

In Korea, the government provides an one-stop service of checking and printing an individual's consumption like credit card spends as a website for the year-end tax adjustment.

There are a need, however, to use that service. It is your digital certificate; to verify you are accessing by yourself. It is one of an evil factor that makes Korea another Galapagos island - which has an exclusive and so internationally incompatible system for Internet banking and so on - different from other countries. I'm mentioning this because I have met no foreigner visited Korea said the digital certificate system is good, instead, they told me it's the worst verification system ever due to an install processes of the certificate into your PC or phone are so much complex, plus, you need to type 2 or 3 different passwords to wire a dollar.

2013년 11월 25일 월요일

When the update or installing packages are too slow in Ubuntu Korea 우분투 소스리스트 업데이트나 패키지 다운로드가 느릴 때

소프트웨어 센터를 열어서 소프트웨어 소스의 메인 서버를 '다음'으로 변경


  1. Ubuntu Software Center
  2. Edit menu
  3. Software Sources
  4. On Ubuntu Software tab, click 'Download from:'
  5. select 'Other...'
  6. Select Korea
  7. Daum
  8. Close

Installing Ubuntu 13.10 Saucy in English and Setting up Korean environment 영어 우분투에서 한글 환경 (한글 입력) 설정


  • Download DVD-1 of Ubuntu 13.10 amd64 (64 bit) and burn the image
  • Boot from the DVD and install Ubuntu with English language but Korean location. (Choose the keyboard, don't go for just US english if yours is not an ordinary one, like my case with PFU Happy Hacking Professional 2)
  • System Settings - Language Support - Install/Remove Languages - Korean
  • Ubuntu Software Center - Search or Filter ibus-hangul and install it
  • Make or edit ~/.Xmodmap to activate 'Hangul' key (한/영 key)
  • Startup Applications - Add '/usr/bin/xmodmap /home/yours/.Xmodmap (and you may want to add a terminal also with a command like '/usr/bin/gnome-terminal --geometry=+480+90'
  • Run 'ibus-setup' on a terminal - Input Method tab - Add 'Korean Hangul' - Preferences - Select your own Hangul keyboard layout (Sebeolsik Final for me, but most people want Dubeolsik) - Set up a key for switching input method as 'Hangul' and decide a key for Hanja
  • Run 'ibus restart'
  • Hide the stupid defaut IBus icon from a tray

간단 한글 번역
  • '언어-영어, 위치-한국'으로 우분투를 설치
  • System Settings - Language Support - Install/Remove Languages - Korean
  • Ubuntu Software Center - ibus-hangul 설치
  • 터미널에서 'ibus-setup'으로 대화상자를 띄워 한글 입력기 설치, 설정 후 'ibus restart'

2013년 9월 13일 금요일

Setting up the color scheme of 256 colors on Vim

Put your 'My_Color_Scheme.vim' file in ~/.vim/colors/

Add the code below into your ~/.vimrc

if &term =~ "xterm"
  "256 color --
  let &t_Co=256
  " restore screen after quitting
  set t_ti=ESC7ESC[rESC[?47h t_te=ESC[?47lESC8
  if has("terminfo")
    let &t_Sf="\ESC[3%p1%dm"
    let &t_Sb="\ESC[4%p1%dm"
  else
    let &t_Sf="\ESC[3%dm"
    let &t_Sb="\ESC[4%dm"
  endif
endif

colorscheme My_Color_Scheme

learned from: http://vim.wikia.com/wiki/Using_vim_color_schemes_with_Putty, and you can also check http://www.vimninjas.com/2012/08/26/10-vim-color-schemes-you-need-to-own/

Setting up Korean (Unicode) Environment of Windows PuTTY

Go to 'Window - Translations' on Configuration Dialog and change 'Remote Character Set' to UTF-8
(This is about text stream that you get from a server; Linux/Unix machine.)

Run regedit
Go to 'HKEY_CURRENT_USER\Software\SimonTatham\PuTTY\Sessions\'
Change the value of 'FontCharSet' to 81 (or your language. 81 is for Korean, hexa)
Change the value of 'Font' to Bitstream Vera Sans Mono (or your font)
Re-run PuTTY
(This is about a font you will use in PuTTY, the font should be installed in your computer.)


learned from http://crawl.develz.org/wordpress/prettify-putty, and http://mynsh.blogspot.kr/2008/11/putty-korean-language-configuation.html

2013년 8월 13일 화요일

Fixed: NVIDIA GTX 560 Ti crash randomly frozen screen (Free commander XE, nvinit.dll_unloaded closing crash)

I use ZOTAC's nvidia gtx 560 ti on Windows 7 x64 at work and it worked fine. After the graphics card driver update (to 314.22), 32-bit based apps like Free Commander XE have been crashed when closing with the dialog saying that nvinit.dll_unloaded and also my monitor screen has been frozen randomly for a few seconds.

The new official vga driver (320.18) was released a few month later and I updated but the problem was not fixed. I found the newest driver doesn't have any change for gtx 560 but only for 600 or 700 series, and also found this solution by googling later, 'downgrading' the driver to 296.10, as I remind myself "Upgrading is not always good."

Problem: nvinit.dll_unloaded error and screen freezing since upgrading gtx 560 ti driver to 3xx.xx version
Solution: downgrading the driver to 296.10
Source: https://forums.geforce.com/default/topic/528468/geforce-500-400-series/freezing-driver-failure-recovery-geforce-gtx-560-ti-twin-frozr/


조탁의 gtx 560 그래픽카드를 잘 쓰다가 드라이버 업데이트 이후 32비트 기반 앱 종료할 때 에러 + 간헐적 화면 멈춤 현상 발생

구글링 하여 296.10으로 다운그레이드 하니까 해결

소프트웨어에 있어서 업그레이드가 늘 좋은 것은 아니라는 사실을 상기함

Xubuntu: Installing a Printer (Canon G3060 PIXMA)

$ sudo apt install system-config-printer Download the proper driver for linux from Canon website. Turn on the printer and set up its WiFi. C...